
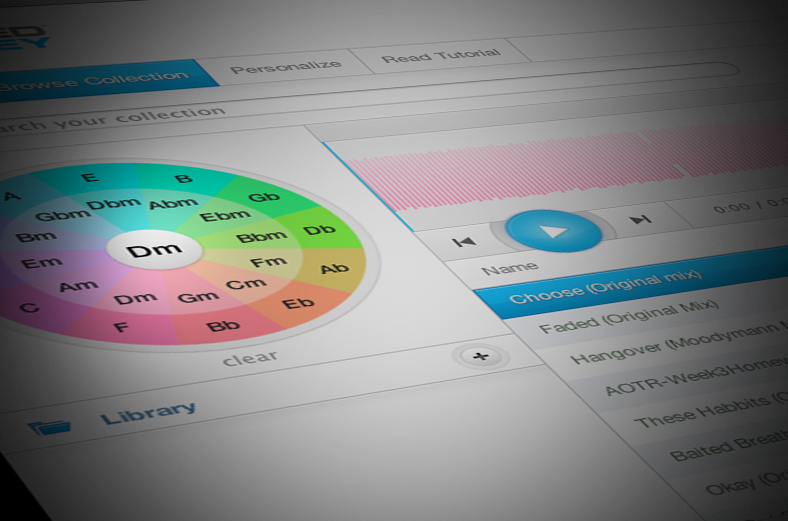
Take your DJ sets to a new level by learning to mix tracks of the same, or complementary root key. Mixed in Key is an affordable solution that scans your library to detect the key (and energy level) of each track added.
Using the Camelot wheel, which is the same as the Circle of Fifths clock face, transitioning between tracks around adjacent “hours” will yield a pleasant, polished and professional blend that sounds natural and harmonic to the listener’s ears. With this method, you can deliver a super smooth journey, and discover unexpected and powerful mixes and mash-ups along the way.
You’ve heard it before: two tracks that should NOT be playing at the same time. A clash of melodies that can snap people right out of their zone, and right off the dance floor.
How I use Mixed in Key with Ableton DJ sets:
- Analyze your tracks with Mixed in Key – at least 20 songs to start since you’ll need enough for each key grouping – Although analyzing is quick, it does take some time (and an internet connection, wtf?) – I typically do it the moment I purchase and download my digital tracks, and before warping in Ableton
- Once analyzing is complete, click MIK’s Browse tab, then click the colored 12:00 (12A / Dbm) hour wedge in the inner clock face – The inner ring is minor keys, which are far more common with modern electronic tracks than majors – This will filter the list to show library tracks in that one key only – in this case, 12A / Dbm, based on your preferences – mine is set to Flats.
- Drag and drop the 12A / Dbm filtered track names from MIK to your Ableton Session View clip grid. Let the clips load.
- If it isn’t done already, set your 1:1:1’s and get your warp markers established.
- Give these tracks a mix – the melodies, bass or lead lines should mix in harmony with each other. Sit back for a bit, let the two songs play simultaneously, and enjoy the session.
- Back to MIK, move clockwise (or counterclockwise) by one hour within the inner ring. Click the inner hour wedge, and reveal songs filtered to the next complementary key (eg, move one step right for 1A / Abm, or one step left for 11A / Gbm). Once filtered, drag these songs into your session grid, and follow steps #4 and #5 above. Mix these songs together back and forth with the previous 12A / Dbm tracks. Everything should sound great mixed together, regardless of the play order.
- In this case, the key has changed, but the mix is still in harmony. This uses basic music theory, but is a quick win for DJs, especially when starting a new session.
- At this point, you can continue to cycle around the inside of the clock, adding tracks of new or the same keys. Once you have a bigger library analyzed, you’ll start to see larger groupings of tracks under certain keys. For me, my library is very light around 12A / Dbm, but is heavy in the Cm – Em (5A-9A) range.
- Going to Majors – This can be achieved by moving from the complementary minor key OUTWARD to the major key. From Dbm / 12A, you move out to E / 12B. I have very few major key tracks, and admit I often forget to go looking for them.
- Once you’re in the outer major ring, the same rules apply. Play tracks in the same key, one key step higher / lower in the outer ring, or back in to the minor inner ring. Just remember: for this to work properly, you must stay in an adjacent key, or by moving to the complementary outer (or inner) wedge – no diagonal jumps.
- You can set up your sessions with rows of Scenes for each key – For me, my first few rows of clips are 12A, and 1A appears below, then 2A, and so on. The bottom of my DJ session ends with 11A.
- To get a little more sophisticated, if you are comfortable with a 4+ track DJ session, channels 1 and 2 can be for minor keys, and channel 3 and 4 can be for majors. No matter where you start in your session, this would allow you to move to nearby tracks, up or down, right or left. Imagine cutting the clock face at 11:59 and stretching it out in a vertical line – that’s what my DJ session looks like – with the scenes named to match the corresponding keys.
It’s important to use this as a guide, and not as a hard rule. There are a number of techniques out there for jumping up 3, 4 or 5 key steps to boost or reduce energy in your set. Play around and figure out what works best. Cool part about all this is that you can start from any track.
Do your best: oftentimes the track you need to drop just isn’t going to work. Oh well, drop it anyway and move on.
You may have a few tracks that play great together, but then a severe key gap surfaces before another awesome block of tracks. Do your best: oftentimes the track you need to drop just isn’t going to work. Oh well, drop it anyway and move on. For these though, I often try to wait for the melody to thin out, where the track is stripped to drums and percussion before bringing in a track of a new key. This reduces the likeliness of foul, jarring transitions.
As a quick example, check out this mash-up I created from Tyga ft Justin Bieber and Andreas Henneberg, both in E-minor.
I also use Mixed in Key to determine what potential mash-ups to explore. Since my library is full of house, hip hop and electronic tracks, filtering them by key is a simple way to identify future potential. And, if I’m producing in a certain key, it’s also beneficial to be able to hear other quality tracks in that same key – sometimes for inspiration, other times digging for samples.
Although Mixed in Key adds one extra step to my DJ workflow, my mixes sound so much more professional and polished. Would love to see Key recognition added to Ableton, but until then, this does the trick.
Related Posts
- 10000
 Traditional vinyl DJs use pitch bending techniques to shift the key of their incoming or outgoing track. This provides some flexibility for blending otherwise incompatible tracks. For Ableton DJ sets, I use what I call the "Y Technique" with Mixed in Key to jump across and around the clock face of the Camelot Wheel (Circle of…
 - 10000
 In a previous post, I outline how I warp tracks for my Ableton DJ sets. Here I'd like to share a few additional discoveries and learnings I've encountered along the way. Your Ear vs. Ableton's Because Ableton has built-in transient detection, it may recommend Warp Marker locations that aren't necessarily where you want or expect them to…
 - 63
 When I stumble on a good mashup during an Ableton session, I just want to capture that shiz and share it. Mashups force you to split your roles to both DJ and Producer, making Ableton the ideal environment to play. On one side, you can be highly experimental and responsive in Session View; on the other, you're editing and mixing down the arrangement. Here are some…


Leave a Reply