

In the first half of this series, I covered the importance of using Ableton’s Session View and Mixed In Key to creatively identify your mashup’s backing and supporting tracks. I also gave some tips for getting your raw material ready, and setting up a new Ableton session. We’re now switching gears from DJ to Producer mode, and I’ll be sharing specific Arrangement editing and mixing techniques I use for creating well-constructed, and well-mixed mashups.
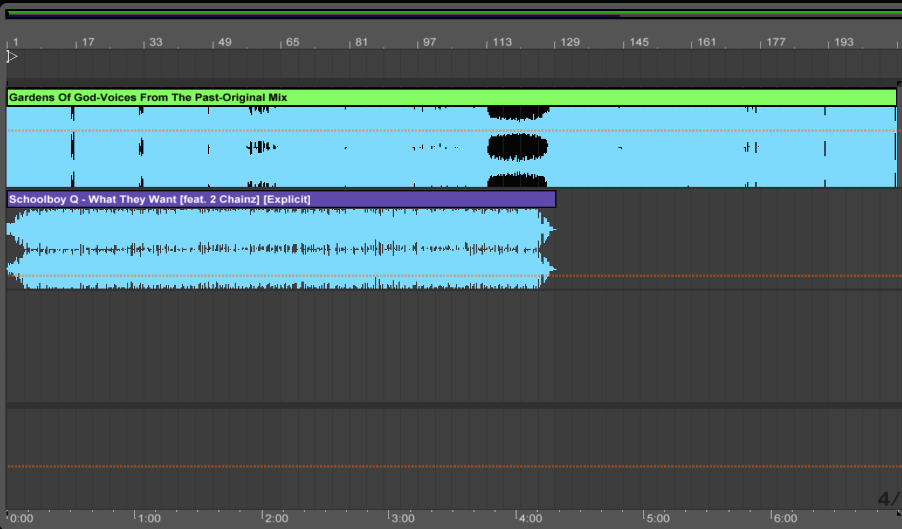
When we last left off, we had a new Session set up with a few new empty audio tracks. Our two source songs are in the highest quality format we could find, and we know from experimenting in Session View that they will play together in perfect harmony, and make for a solid mashup.
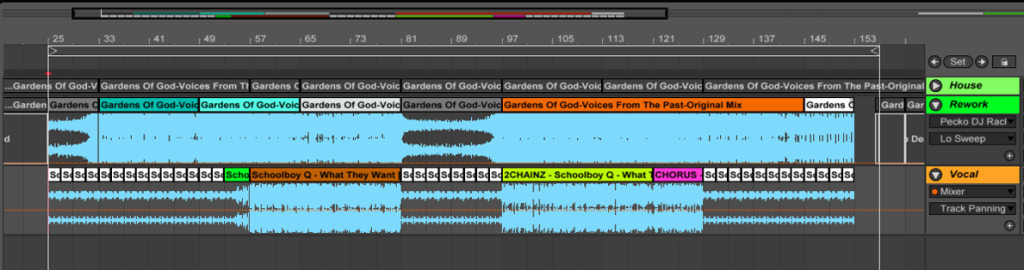
Below you’ll find my latest mashup: Schoolboy Q ft 2 Chainz “What They Want” VS Gardens of God – “Voices from the Past.” It’s a little scandalous, and definitely NSFW, but that’s how I do it. Feel free to give it a listen while you peruse the techniques below.
Step 1: Import Your Backing Track
- Start by dragging your (high quality AIFF / WAV) backing track onto the first audio track in the Arrangement View, at 1:1:1 on the timeline.
- With the song selected, disable the Warp button (if it’s on) – Right there, you should now see the original tempo (un-warped Segment BPM) of the backing track. [Note you can also use Mixed in Key or other tempo detection tool for this value.]
- Enter this exact tempo into the Global Tempo at the top – I recommend starting your mashup at the original tempo since it’ll require the least amount of algorithmic time shifting – The less you stretch a track, the better it’ll sound – Don’t worry, we can adjust it later
- Now enable the Warp button , set Complex Pro mode for the clip – No (or very little) stretching should actually occur, as the two tempos are consistent. You might be wondering why we’d even need to use Warp: the reason being we’ll still need to fine-tune our Warp markers and chop the track down into chapter or scene segments – each of which will need to start on the 1 beat. No Warp mode, no Warp markers.
- Go thru the process of properly Warping the track – Set your 1:1:1, Warp from Here (straight), and add enough Warp markers down the length so that the track plays to the metronome until the song ends – Pay special attention to transitional start points, those starting new sections (commonly the 17, 33, 65, 129, etc)
Step 2: Add the Supporting Track
- Drag your supporting track onto the second audio track below the backing track, and set it to start at 1:1:1 – Right away you’ll be able to see what you’re working with, as one song will be visibly longer than the other
- Go thru the same process above of properly Warping the track –
- Note, if this track was already Warped and cut into Clips in Session View, you can use Tab to jump over to Session View, click and hold those Clip(s), press Tab again, and drop it onto the audio track. If they’re in time and ready, there’s no reason to do this work twice. I would, however, still recommend going thru Step 3 below, as you will most certainly make a discovery.
- If you have an acapella, you’ll save yourself a ton of time trying to EQ and mid-side compress out the competing frequencies (later) – Plus, most acapellas don’t require a complementary key – However, you will likely have some challenges warping the track – Finding the 1.1.1 can be a real bitch – For this process, it usually helps to also bring the original track in, and then align it with the acapella before continuing.
Step 3: Track Analysis
Analyzing the two songs will help you understand how each of the tracks has been arranged, what elements and scenes are included, and how the energy builds across each track. Some refer to this process as “deep listening” – whatever you call it, we just need to determine what beats and sections are available for use, which ones we’ll ignore, and where we can get creative with the mashing.
- Solo your backing track and begin playback – everything is already in time to the metronome, and your 1.1.1 is tight. If not, add Warp markers now to fine tune.
- Watch the waveform density / height around the 9, 17, or 33 – Usually these first 8 / 16 / 32 bars are the length of the Intro. We’re looking for where the Intro ends and Section / Verse 1 begins. This is much easier with vocal vs. electronic tracks, but really you’re listening for a fuller groove, or a change in energy.
- Click on the nearest bar (17, 33, etc.) to insert a marker (the transition point before Section 1 begins)
- Use Cmd-E (Ctrl-E) to “Split” the track – Ableton has now cut the Intro segment off from the rest of the track –
- Right-click the Intro segment and change its color – you can Cmd-R rename it to “Intro” if you’d like
- Keep moving down the line – trim out and color code each section: eg., Intro, Section 1, Chorus, Section 2, Break, Chorus, Outro – You can be as broad or granular as you want – Keep playback going with the metronome, deep listening and correcting for tempo shifts –
When you’re done, each segment should work as a building block for your new arrangement. All of these clip segments should start and finish clean (think: seamless loop). And yes, there will likely be some transitional issues – just be mindful of these and flag the ones that may be problematic (eg., vocals or delays that spill into a break)
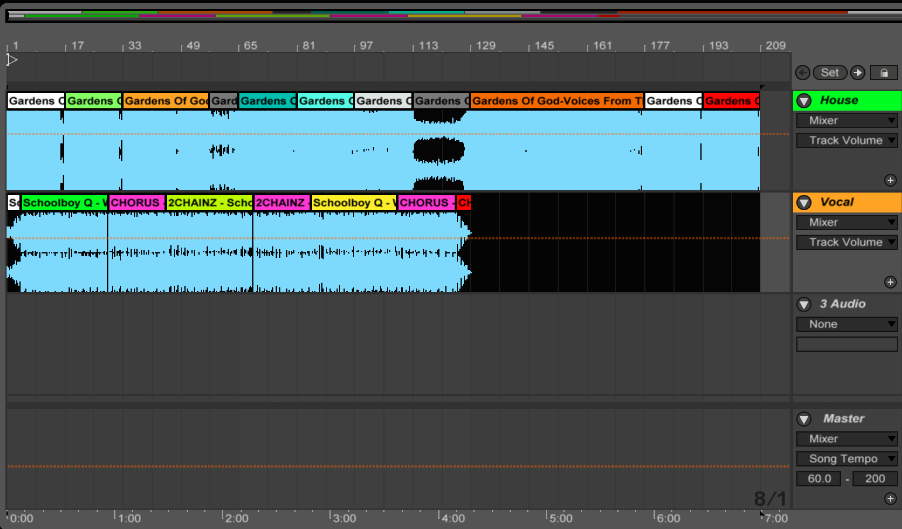
Repeat this same process for your solo’d supporting track – Note, the segment colors don’t need to match across the two tracks, just use whatever works best for you. As long as you can quickly identify the specific section of the song you need, that’ll work –
Color coding is great because it’s really easy to spot equal length segments across songs – these complementary sections could be ripe for mashing
Step 4: Identify Mash Opportunities
Stop to take a look at both of your segmented tracks. Do you see areas where overlap could occur? For example, if Track 1 Section 1 is the same length as Track 2 Section 1 (Vocal 1), those two phrases can potentially overlap in the mashup. With this quick assessment, we can start editing and rearranging.
Step 5: Laying the Foundation
If you want to add the vocals from the supporting track to the arrangement of the backing track, but keep the backing track as-is, unaltered in form and length. you can skip ahead to the next step.
But, it’s quite common to remove certain sections (vocals, breaks, etc.) from the backing track before mashing in the supporting track. Usually there’s something I need to massage, where editing is necessary.
We’re going to use a new empty audio track to edit and rearrange the segments of the backing track. We’ll copy over the sections we want to use to this new track, and then move these blocks around to achieve the following:
- The groove foundation and structure for the mashup
- Enough of the original melody and progression to remain identifiable
- Proper segment lengths to align with elements from the supporting track
- Removal of any unwanted material
By keeping the original segment order on the first audio track, we can reference the original song progression. Plus, when you just need to insert 4 / 8 bars of the beat, all of the segment options are right there, color-coded, and ready to copy into place.
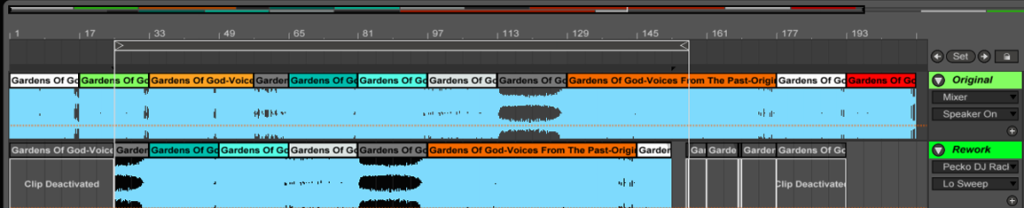
With the backing track cut into perfect segments, you can now decide how much of the original progression you’ll use. Simply copy the segment chunks down to the new track, and move the bits around until you’re satisfied with the flow.
Generally speaking, you should now have the foundation laid – Your backing track is edited and arranged how you want it, and the supporting elements all begin on the right measures.
Step 6: Aligning the Phrases
The following “inside-out” method aligns the vocal phrases from the supporting track with the available sections from the backing track, and then fills in the gaps:
- Keep the backing track where it is, and move ALL segments for the the supporting track horizontally (to the right) so that the two songs share a common overlapping first phrase length – For example, both Section 1s are overlapping in time with each other and are sharing a start point
- Continue this process for the remaining phrases you wish to mash
- Work to get the all segments of the supporting track to fit together nicely with Track 1’s arrangement.
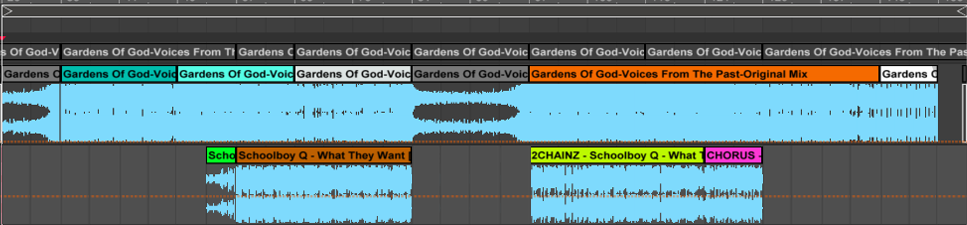
Once you set the start of the first segment, songs of a similar progression / formula may automatically align all remaining segments.
Step 7: Filling-In The Gaps
There may be holes in your mashup now. If Track 2 Chorus is shorter than Track 1 Chorus by 8 bars, then we’ll need to pad an additional 8 bars into Track 2 Chorus to re-align the start of the next segment.
You can highlight a phrase and use the Cmd-D “Duplicate” function to insert a copy in place. Track 2 Verse 2 should then start in time with Track 1 Verse 2 –
This becomes an editing exercise, which is very easy to do in the Arrangement timeline with simple copy and paste methods.
Helpful editing keyboard shortcuts:
- Copy and Paste Cmd-C / V
- Cmd-D to Duplicate selection (repeat indefinitely to fill the timeline)
- Hold Option (Alt) when clicking and dragging to duplicate a clip
- Cmd-E to Split a clip at an inserted marker
- Cmd-Shft-V (hold Shift when pasting) to insert copied time (eg., insert “in front of”)
- Press 0 to disable a clip – sometimes better than deleting, you might need it
Other editing discoveries & tips
- If your source segments aren’t transitioning smoothly between scenes, try pulling the clip’s edge so that it extends to overlap the adjacent clip – sometimes extending a clip by a single bar can create a smoother transition – As there are two clips here, try adjusting the edges of both to see which direction sounds better
- Select “Fades” from the track’s Fades / Device chooser drop down menu on the mixer – Once revealed, you can drag the Fades along the clip edges inward to create smoother fade-in / -out transitions – These come in handy when cobbling together granular clips, or are looping segments that have an obvious tail or hard cut
- Before the song thickens up sonically, Intro’s often hold the cleanest source for bare beats (4 on the floor, etc.)
- Be mindful of Soundcloud’s copyright protection – (although I cannot confirm this) if your mashup begins with only one track playing from its original start, its “digital fingerprint” may get sniffed out, restricting your track (boo!)
- Once the bulk of the foundation is laid, decide if there are any extraneous scenes that can be cut – In longer electronic tracks, the first 64 bars can be gradual and slow to build – cut these sections off and choose a new start point
- Consider adding one more audio layer for transitional effects (crash, sweeps) and vocal samples or glitchy stutters. Play with effects and sends at this stage.
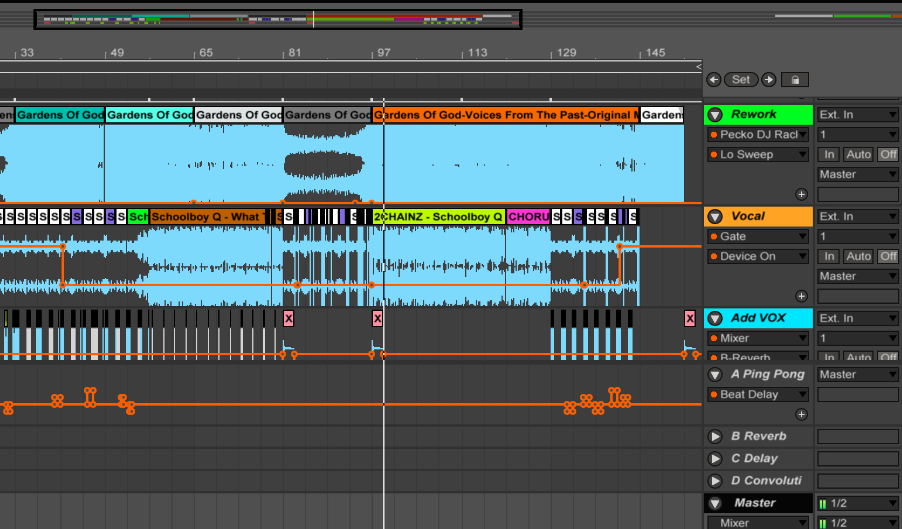
Step 7: Mixing
Your source materials have already been professionally mastered, but one may be of higher quality than the other. Here’s how I approach this final step:
- Start with each track volume around -10dB and adjust from there – See my Quit Clipping article for other tips on gain staging and limiting
- Use EQ8s on each track, and cut the low end (~150Hz) off your supporting track – This is completely up to you, but it’s hard to have a quality mix if there are too many drums AND bass lines going at once (especially with an AIFF + an MP3) , for the entire length of the mashup. Automation may also help here.

- Consider a subtle gain reduction in your midrange around 500Hz on your backing track to help clarify vocals from your supporting track
- Use a MIDI Controller (like the APC40) to dial in your effects – something about using encoders has a much better feel for accuracy than trying to do mouse-work
- Use parallel compression on your supporting track – Check out this recent video on The Recording Revolution (albeit Reason) – Set up a new Audio track, route the audio in from the original track, and drop in a compressor with pretty extreme settings – Then, dial-back the track volume to taste – really helps bring things forward and adds some depth that was stripped away by the EQ8
- Get the Simple RMS M4L plugin – I learned about this free device from the Mastering in the Box with Ableton Live course by Zeitgeist Mastering. Although it’s a little challenging to read (it moves too fast), you can see what your peak RMS value is during the fullest part of your mix. Many professionally mastered releases are in the -12dB RMS range. With a basic Limiter or Glue Compressor on the mix bus, you can boost the final output to get closer to this volume.
- Listen on multiple speakers before exporting to WAV: earbuds, monitors, headphones, laptop – if it sounds good on a mono midrange speaker, it’ll sound good anywhere.
There you have it. Here is my collection of mashups and remixes I’ve completed using the method above – some took longer than others, and they definitely sound better each time I finish one.
If you’re an Ableton DJ who hasn’t yet got into mashups, (first, I’d be surprised, but) I hope this walk-thru has helped give an inside look at my personal process. As we all know, there are ten ways to do the same (one) thing in Ableton – this is just how I do it. And if I’ve missed anything, or you need some clarification, please leave a comment below.
Related Posts
- 10000
 When I stumble on a good mashup during an Ableton session, I just want to capture that shiz and share it. Mashups force you to split your roles to both DJ and Producer, making Ableton the ideal environment to play. On one side, you can be highly experimental and responsive in Session View; on the other, you're editing and mixing down the arrangement. Here are some…
 - 10000
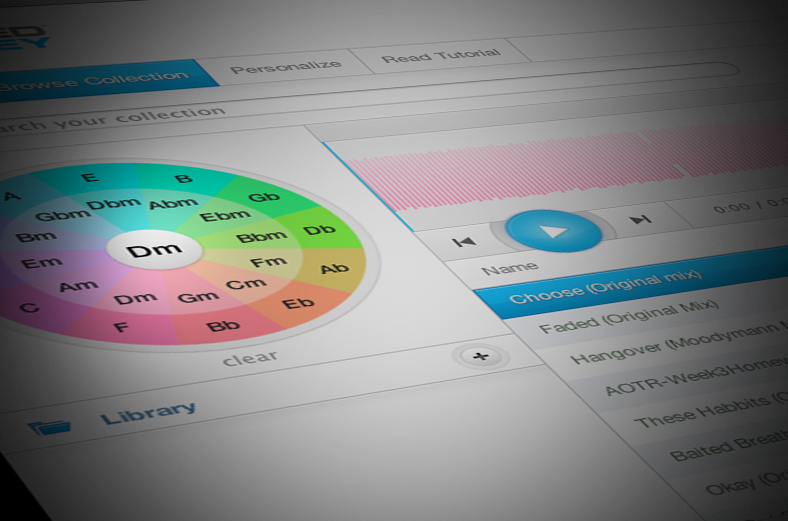 Take your DJ sets to a new level by learning to mix tracks of the same, or complementary root key. Mixed in Key is an affordable solution that scans your library to detect the key (and energy level) of each track added. Using the Camelot wheel, which is the same as the Circle of Fifths clock face, transitioning…
 - 10000
 I don't get any kick-backs from SoundCloud to promote their service, but I do find it to be one of the easiest and most valuable ways for DJs and producers to distribute their beats and mixes. Plus, I personally discover loads of new and emerging music on the daily. Here are some tips for maximizing your SoundCloud experience. Build…


Leave a Reply