
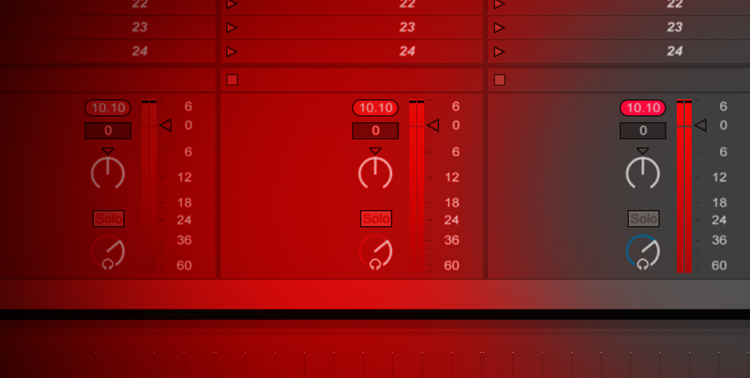
I’m always surprised to see red meters in other guys’ DJ sets. Even worse, in Ableton training videos on YouTube. Red is BAD, people. Your meters go from green to red for a reason. By pushing tracks beyond those maximum levels, your audio is actually getting destroyed in the process, adding crunch, noise and artifacts to your mix. Now let’s talk about how to avoid it altogether.
This is really a discussion around gain staging. We’ll define gain staging as the process of balancing your individual track volume faders so that they work in unison before heading out to your master. This is true for any multitrack audio production or working in a DJ set.
There’s a natural tendency to think “this track isn’t as loud as the others, so let me crank its volume.” I did this for years, and 99% of the time, it’s incorrect.
Instead, what you should actually be doing is reducing the gain on all of the tracks. And I’ll be the first to admit, it’s very very difficult to shift your approach to this type of thinking.
Bad news: clipping on the Master, you never want to see red here.
Audio waveforms have an interesting behavior in that, when tracks get combined at the master level, their peak levels are almost added together, not averaged. This means that two tracks playing simultaneously at 0dB will actually output at a level above 0dB, pushing you into the red and ruining your final mix. So let’s fix it.
Here’s the method I use:
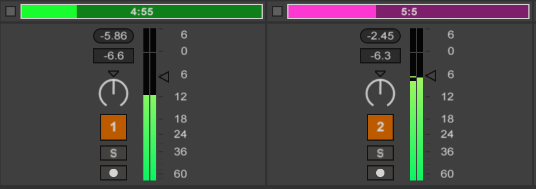
- Start with the volume faders on each track to somewhere around -6 to -12dB
- Always keep your Master at 0dB (aka “parity”) – Only use the Master volume fader to fade out your final mix, or to kill the volume when handing off to another DJ – otherwise, don’t ever touch it – 0dB is going to provide the optimal output at the Master level
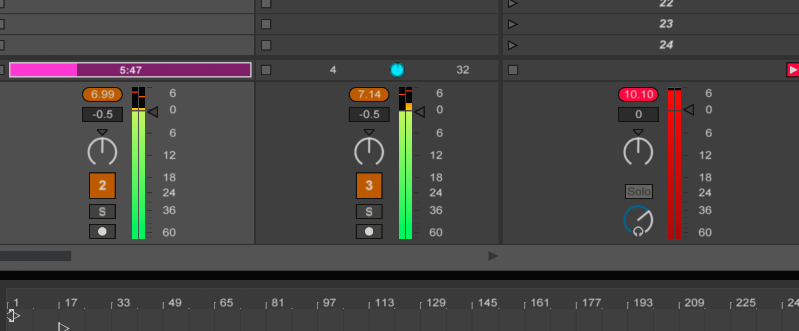
- Pull the top bar of the Mixer section in Ableton’s Session View up so your meters are really tall – At a certain height, they’ll reveal a more granular legend for your peak dB levels
- Launch your first clip – Watch the Master meter to see where it peaks – It’s probably near -12dB, wherever the first track is set (assuming of course you don’t have a bunch of effects and plugins on that channel)
- Next, launch your second clip – With both clips playing (at -12dB), watch your Master meter – You should see that these two simultaneously combine to output at a higher decibel level – probably closer to -6dB
- Try reducing both track volumes, then increase both tracks – You’re looking for the sweet spot between combined volume level, clarity, and most important, avoiding clipped signals altogether.
So, imagine a producer session with 10 instrument tracks going – In order to keep everything below 0dB on the Master, you could only guess how far DOWN you’d need to bring a number of those tracks to avoid clipping. Some of course will be louder to be more present and forward in the mix, others more quiet in the background: this is the process of gain staging.
But it’s not loud enough!
Yeah, I had a feeling you’d say that. I often find myself still saying that.
And here’s the easy solution: turn up the output volume on your audio interface, from your system volume, or on your studio monitors.
It’s that easy. And look, you still “turned it up”, but you didn’t use Ableton to accomplish that – instead, you relied on your hardware to solve the problem.
When working inside Ableton, it’s super easy to just click and crank the volume levels. Resist the urge! Instead, try to mentally separate these two things:
- Final output volume of what you are hearing – (eg., how loud is it?)
- The balance of any tracks playing together – (eg., can I clearly hear both)
You can always make things louder (I’ll cover that in another post). You can’t repair the mud and crust that forms when two tracks are competing and colliding in their frequency spaces. Better to have them play nice together, but quieter, than have it sound shitty, but louder.
Tip: Get into the habit of turning up your audio interface when you first start Ableton – you’ll be surprised at how low you’ll go with your track volumes.
Using Ableton’s Limiter
Limiters are a type of compressor that puts a cap on a maximum output. They can also boost output levels, but are often misused. There’s a lot of debate about limiters, but these are tools in our toolbox. So hear me out.
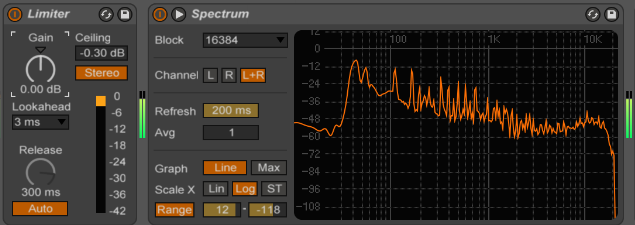
- In a DJ set, I always put a default limiter on my Master, with a -0.30dB ceiling. This automatically prevents any redlines / clipping, as it gets cut just below 0dB. Can it disguise / hide existing gain staging issues? Absolutely. But, I’d still argue a limited Master will sound better than a clipped Master.
- For producer sessions, I always put a default limiter on my Master, with a -0.30dB ceiling. Sound familiar? Yeah. This is a practice I use regardless of what I’m doing.
I recommend for producer sessions, you occasionally disable the limiter to check your gain staging. Yes, the limiter ultimately helps you avoid clipping on your Master, but it can also hide problems that could otherwise be addressed at the track level. Create a keyboard shortcut for it, to toggle it on and off, then you’ve got it there if you need it.
Many would argue that no limiter should ever be required on the Master, and generally I’d agree. If your gain staging is done correctly, you’d never need to rely on a limiter to “fix” or “catch” these issues. Important to note that if you produce pre-masters that you intend to send out to a Mastering engineer, no limiter should be included on the Master, as it is compressing the signal, even if just a little. They’ll want that extra headroom to work their magic.
Last word on the limiter – if you do use it as it’s intended, you shouldn’t see any more gain reduction than approximately -3 to -5 dB max – That is, the downward meter on your limiter should not dip below the -6dB mark. If it’s jamming down to -10dB and beyond, you should go back and reduce your track volumes, or re-evaluate what you have driving those tracks.
Don’t forget to take breaks. Ears fatigue very easily. I know I’m guilty of slowly increasing my headphone volume throughout a night of mixing. Occasionally use silence, and try focusing on quieter distant sounds to keep your ears in top shape.
Keeping out of the red zone will help with your overall audio clarity and fidelity. And that should be a goal of any good DJ or producer, wouldn’t you agree?
Do I have it all wrong? Have anything to add? Let me know in the comments.
UPDATE: I just read this interview with Jimmy Douglass on The Fader, talking about how Timbaland would push certain tracks into the red, just because “he recognized it as something special.” Cannot argue with that.


Leave a Reply