
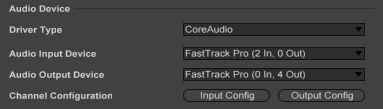
My audio interface has served me well, going strong for nearly five years now. The M-Audio Fast Track Pro has since been discontinued, but it’s essentially a portable, USB-powered, 4-output audio / midi interface with a front headphone jack. The benefit here? Not only does it fit in a backpack, having the 3/4 channel allows you to cue your inbound tracks as if you were using a traditional DJ mixer.
How to Set Up Your Interface & Session for DJ Cueing
- Make sure your audio interface has four audio outputs
- Open Audio Preferences in Ableton
- At the top, select your interface from the Audio Input / Output Device drop downs. Not seeing it in the list? Power down the interface, unplug the USB, re-plug, power it back on – it should show up here.
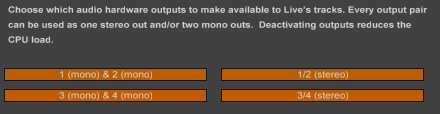
- Click the Output Config, enable all four outputs – Mine shows as 4 mono channels (1 and 2, 3 and 4) or two separate stereo channels (1/2, 3/4)
- In Session View, click the I/O icon on the Master (if it’s not already shown)
- In the I/O section above the mixer, for Cue Out, choose channel 3/4 stereo
- For Master Out, choose channel 1/2 stereo
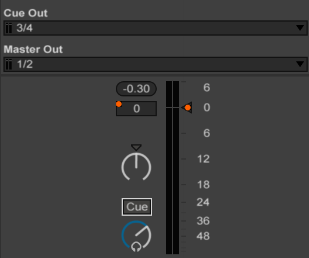
To the left of your Master fader is a small box for Solo / Cue
- Cue mode: you’ll be able to monitor your tracks independently from the Master 1/2 channel by listening to the 3/4 channel
- Solo mode: the default, allows you to solo one or more tracks
Just remember, if you set both I/O Cue Out and Master Out to 1/2 stereo, cueing will be disabled, and you’ll only have the option to Solo tracks.
How it works
- You’ll need your headphones and monitors / speakers set up first. With tracks playing, you should hear the audio coming thru your room speakers on channel 1/2. Depending on your interface, you may or may not hear the Master mix in your headphones: some interfaces have a mix dial that let you blend both channels to the headphone jack
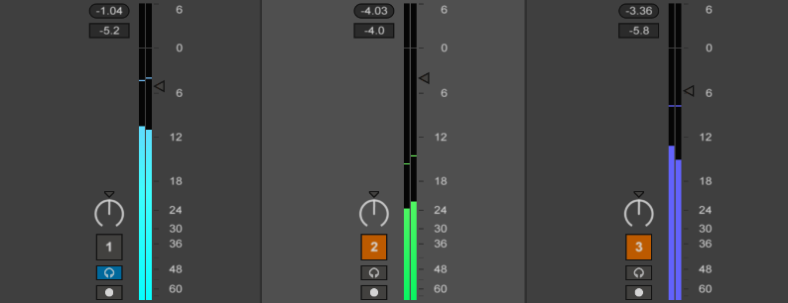
- Switch into Cue mode, then click the small headphone button on the incoming track (previously the Solo “S” button). Now featuring blue meters, this track is sending audio to your 3/4 channel to your headphones – Again, you may or may not
be hearing the Master channel mixing with the Cue channel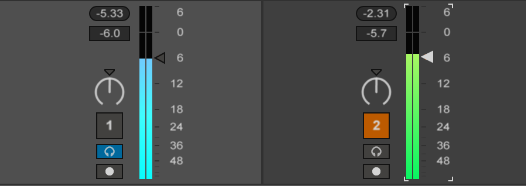
- Now deactivate the track; the monitored track continues playing in your headphones. This would be the point where you’d have one earphone on, and one off, so that you can hear the room / nearby monitors, along with the cued track playing only in your earphone.
So here’s where it gets tricky
I like having the ability to prep and monitor incoming tracks in isolation, but also want to switch to hear the Master. Here’s the situation: you have your incoming track cued up, but you need to hear how it’s going to come into the mix – the way the floor is hearing it. Many DJ mixers have this feature: it’s a Master mix for the headphones.
One way to monitor individual tracks and toggle the Master:
- In your Record / Warp / Launch Preferences, disable Exclusive: Solo (and Arm, for that matter) – This gives you the ability to select multiple tracks for Solo / Cue – If you prefer to keep these enabled, you can always use Control-click to multi-select tracks
- Create a new Audio Track (Cmd / Ctrl-T)
- For the I/O, Audio From: Master
- Deactivate this track. This track will now be used as your “Floor” monitor – It’s no different than listening to your Master output
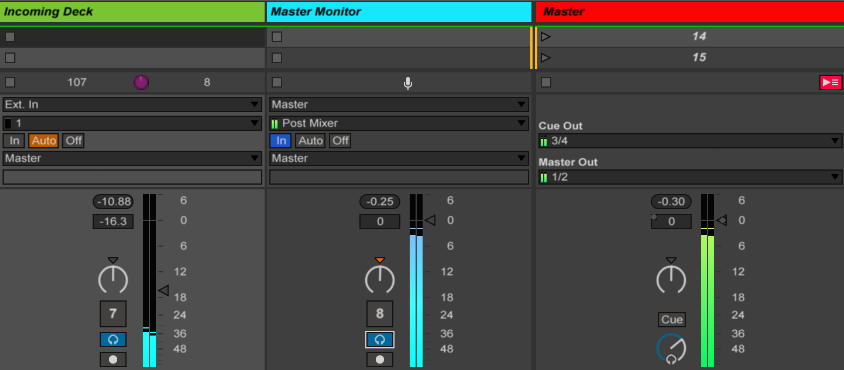
- Continue to use the cue buttons to monitor individual tracks in isolation
- When your inbound track is ready to crossfade in, ENABLE the cue button on the Floor / Master Monitor track, and DISABLE the cue on your inbound track
- Activate and fade up your track volume
You may be able to keep your Master Monitor cued and live the entire time. What I’ve found, however, is that the volume of the inbound monitored track drowns out the Master, so it’s hard to tell if you’re coming in hot. Play with it, let me know if you’ve got a better idea.
Truth be told: I’m hardly ever out cueing-up tracks on-the-fly.
I don’t get song requests (often), nor would I leave Ableton to go digging-up something obscure in my hard drive (at home, sure!). Instead, I set up my session with enough tracks and variety to be ready for a couple of hours.
I practice my sets ahead of time, and flag areas for flexibility, creativity and experimentation. Since my clips are already warped properly, using headphones becomes quite optional. But even if you’re not cueing, do yourself a favor and run your headphones from the master: you never know how the sound will be in the booth.
Oh, if you ever see purple meters…
A purple meter means that the track is live, but no audio signal is leaving your outputs. This is usually an audio routing (I/O) issue. I once unpacked someone’s ALP project, went to play the track, and was greeted with two purple meters. Turns out he had routings to various channels of his 8-channel audio interface; my instance of Ableton simply couldn’t find them – and wouldn’t play them either. Re-check your Master I/O settings to ensure Master Out is 1/2, and that your Track I/O settings aren’t routing to missing channels. “Sends Only” also reveals this behavior.
Related Posts
- 10000
 If you plan to gig in clubs, or need to mix late at night, you'll want to find a reliable set of cans. After a few entry-level options, I did some research online and picked up a pair of Pioneer HDJ-2000s at my local Guitar Center. Things to look for when buying headphones: A wide…
 - 10000
 When packing for a recent gig, I noticed I was carrying way too much shiz in my bag. I was familiar with the venue's booth, but something always tells me to be prepared, just in case. Bad cables, missing adapters, poor lighting - who knows? I splurged on a dedicated MONO EFX 365 bag. It comfortably seats my…


October 18, 2018 at 11:47 pm
Thanks for this great article Steve! Much appreciated!