
BEFORE READING ANY FURTHER
I’ve received a number of comments on this post about how wildly inaccurate and flawed my assessment of this situation is. I am no expert on this matter, and have never claimed to be. And I’m not afraid to admit that I could be (ahem, likely am) wrong. Ableton has always been a hobby for me. The write-up below was based entirely on my own personal experience, on an older version of Live, and I strongly urge you to read this Reddit article in hopes to clarify what I (and maybe you) have been perceiving; it includes some alternate tests that you are welcome to try. Cheers
I recently subscribed to the “Your Mix Sucks” series by Marc Mozart, and learned loads of tips as to how to get a great mix in my home studio. One such tip suggested inserting a track-level “gainer plugin” instead of moving the default track volume fader. Skeptical, I decided to try this technique in Ableton, and the results have completely changed my workflow.
In a previous post about Clipping, I suggested track volumes need to be turned down to create a better overall mix, once sent out the master. This still holds true. What I’ve noticed, however, is that during a DJ set (especially), reducing the default track fader of Decks A & B (+C & D, etc.) in Ableton to -12dB seems to “thin-out” the audio signal. This causes the meat of the track to disappear. And although the higher frequencies remain in tact, lower-end drums and bass are impacted noticeably.
Almost like a bandpass filter, this scoops-out an obvious hole in your mix, which is amplified further on a PA in a club environment. Trying to bring Ableton in after a CDJ is nearly impossible; you’ll just never get to the quality and clarity levels of the previous DJ. In my opinion, it sounds tin-ny, and cheap – almost like, “this guy is definitely mixing MP3s.” Bad news.
So, how do you keep your signals clean, full, and loud, but prevent distortion and redlines during a live mix session?
Mozart, a seasoned mix engineer, claims that producers have a tendency to set up their sessions too hot, oftentimes providing him their stems at 0dB. This means that without enough headroom on each of the tracks (approx -12dB), the mix gets crushed and/or distorted when any mix-down processing is applied. His recommendation is to keep your track levels at unity (0dB), and to insert a gainer plugin on each track. With the plugin in place, you can then reduce the plugin gain (for added headroom), without compromising signal integrity.
In reading the recommendation from Mozart, I wanted to see if there’d be a noticeable difference – on headphones, and monitors. And holy sh*t was I surprised. Really, the only way to demonstrate how well it actually works is by trying this yourself. It’ll take all of 2 minutes – and might change your life.
Here’s what you need to do in Ableton:
- Set up an Audio track, make sure the Track Volume is at 0dB
- Add a clip to this track in the Session Grid; WAV or MP3, it doesn’t matter
- Cmd-D (or Ctrl-D) to duplicate this track – we now have two of the same
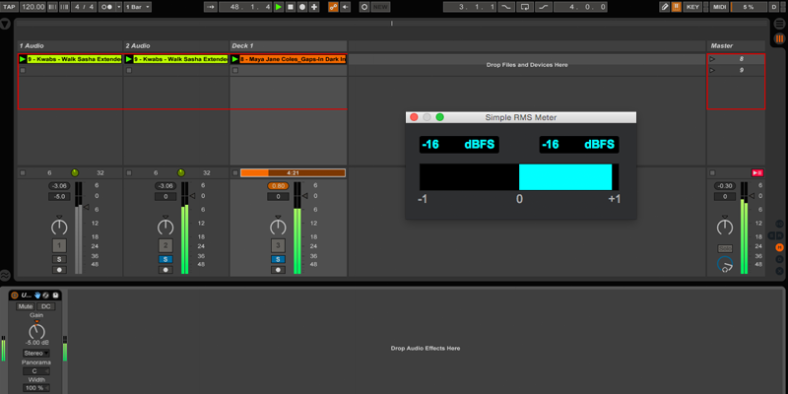
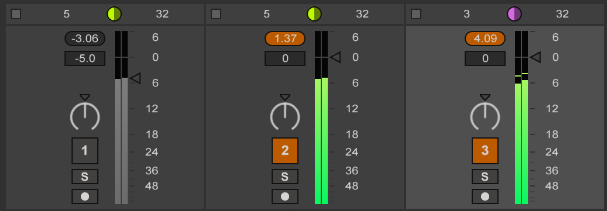
- On Track 1, reduce the Track Volume to -5dB. (This might be your typical setting for a DJ set)
- On Track 2, insert a Utility device and reduce its Gain knob to -5dB
- Create a third Audio track – add a different clip, and set a loop – this will be the song you’ll be mixing into –
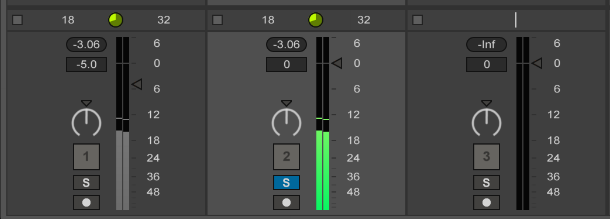
- Solo Track 1 and Track 3, and launch the Scene (so all three clips are playing simultaneously)
- Let the beat ride, then toggle between Track 1 and Track 2 –
- Listen on headphones and monitors
Can you hear the difference? I certainly can. For a second I thought I was high, but when I pulled off my headphones and went direct to my monitors, it was much more obvious. The tracks sounds so much fuller, wider, deeper and lively during the mix when using the Utility. The kicks also sound punchier. With an RMS meter on the master, it appears both tracks have the exact same peak output level. This exercise demonstrated to me that Ableton’s track faders aren’t using the same gain algorithms as the Utility device. Not exactly sure why – and they should.
In prepping for my last gig (set embedded below), I decided I’d go this route. I re-mapped the Utility gain to my APC40 track faders. Beauty! But then noticed something strange. Although the Utility will go to -35dB, it does not go to complete silence. There’s a very quiet signal still passing thru the track, and thus out the mixer to the PA. In order to work thru this new issue, I found (via Ableton forums) that you actually need a few Utility devices grouped together to reach absolute silence.
How to achieve silence
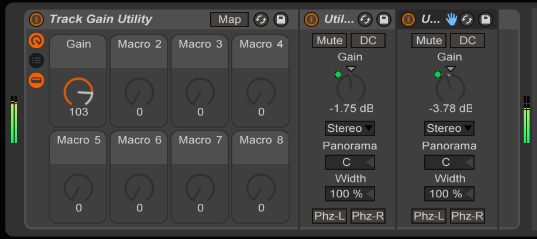
- Simply add a second Utility device (and a third, if necessary) to the track
- Group these 2+ Utility devices
- Map each Gain knob to Macro 1 on the group
- Edit the mapping so that the first device range goes from -35dB to +6dB. This gives you a little extra boost just in case you need it.
- Map the second device range from -35dB to 0dB. [We do this because we don’t want to add any gain, only subtract.] Note, it may be possible to increase the -35dB to a higher value; play with it until you can get complete silence when the Macro is down at 0.
- MIDI-map the Macro 1 to your APC / hardware track faders
- Save this Utility device to your library, then drag it to your other tracks, and map to hardware as necessary
Some observations:
Because we have inconsistent values / ranges, the Macro 1 knob, unfortunately, uses a typical MIDI 0-127 range, and doesn’t reveal the volume dB (it would IF they were mapped identically).
The other issue I’ve encountered is that the physical range of the APC hardware fader is greatly reduced. That is, my tracks are only at a playable level when in the top 20% of the height of the fader. This isn’t much room to work with, and I would love to figure out a way to utilize more of the fader distance. Let me know if you’ve discovered a workaround in the comments.
Last issue with this approach is that the small triangles on the track volume don’t provide you the visual feedback you’re likely familiar with. The meters still work, but it certainly forces you to use your ears more than your eyes – which isn’t a bad thing, right?
I hope this exercise has opened your ears. If I’m high and hearing things, let me know in the comments. And do check out Marc Mozart’s “Your Mix Sucks” series, it’s a steal and offers dozens of other great mixing tips.
Related Posts
- 10000
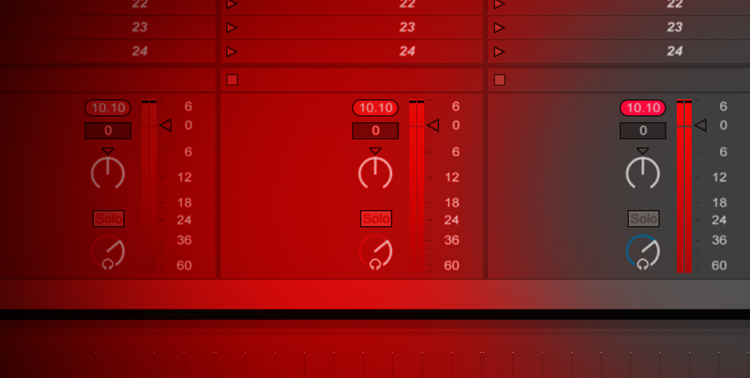 I'm always surprised to see red meters in other guys' DJ sets. Even worse, in Ableton training videos on YouTube. Red is BAD, people. Your meters go from green to red for a reason. By pushing tracks beyond those maximum levels, your audio is actually getting destroyed in the process, adding crunch, noise and artifacts to your mix. Now let's…
 - 10000
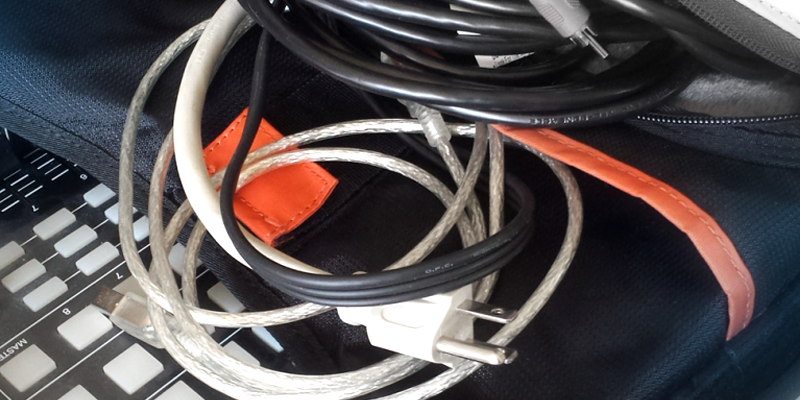 When packing for a recent gig, I noticed I was carrying way too much shiz in my bag. I was familiar with the venue's booth, but something always tells me to be prepared, just in case. Bad cables, missing adapters, poor lighting - who knows? I splurged on a dedicated MONO EFX 365 bag. It comfortably seats my…
 - 10000
 In the first half of this series, I covered the importance of using Ableton's Session View and Mixed In Key to creatively identify your mashup's backing and supporting tracks. I also gave some tips for getting your raw material ready, and setting up a new Ableton session. We're now switching gears from DJ to Producer mode, and I'll be sharing specific Arrangement…


April 26, 2018 at 12:36 am
For DJing, do I need a Utility devise on both my tracks ?
Thanks.
February 6, 2019 at 12:58 pm
If you follow the method outlined here, then yes, you would insert a Utility on all tracks you plan to mix with. Then, assign the Utility gain to your controller’s fader, which would override the default MIDI control of the track volume.
September 30, 2017 at 9:17 am
Hmmm. Strange. I don’t know if it’s because Ableton may have fixed the issue with the track volume versus Utility gain that you describe but when I try it myself there is no difference whatsoever. I have also done reverse phase tests and they come out as complete silent.
February 6, 2019 at 1:03 pm
Good to know & thanks for running your own tests to confirm.
June 19, 2017 at 1:46 am
Maybe Steve shouldn’t give too much advice.
https://www.reddit.com/r/ableton/comments/6i413v/disproving_an_article_about_ableton_volume_faders/
February 6, 2019 at 1:16 pm
LOL – maybe I shouldn’t be giving advice. Anyone who has read this post, definitely learn more on Reddit from the experts before deciding to perform the test above.
June 18, 2017 at 10:03 pm
This article is testibly false, for anyone else the comes across this, heres a link to a detailed explanation: https://www.reddit.com/r/ableton/comments/6i413v/disproving_an_article_about_ableton_volume_faders/
February 6, 2019 at 1:18 pm
Well, my ears are fooling me then – I am updating the intro of this post to reflect the expert opinion of the Reddit community.
December 2, 2015 at 11:50 am
Glad you put this to the test! Very handy, I love the Utility plugin, one of my favorite plugins in Live!
Rather than using two utility plugins, you could map a macro to “mute” the utility when the level reaches -35db. Since it’s already so low, it probably won’t be noticably audible that it mutes (especially if mixing into another track). Also, since it won’t be pulling down two utility levels simultaneously, you’ll have a finer degree of control over the overall volume. Just an idea 🙂